Nexternal Solutions – Help Desk – Image Gallery Feature
In this video I’m going to show you how to set up and utilize the image gallery feature on your Nexternal storefront.
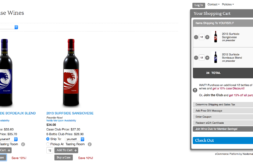
One of the best features that Nexternal has available for product pages is the image gallery feature. The gallery feature gives you the ability to display multiple images for a particular product then by using the rollover effect you can change the main product image that is displayed on the screen. This feature is great if you have a product that has multiple color options or you would like to show several different views of a particular product.
Setting up the gallery feature for your products if very easy, but there are two things that will help you along in the process.
First, you’re going to have 2 or 3 different sizes of images that you are going to use. You will need one for the gallery or mini-thumbnail image, one for the main image and maybe one for the large image. So if you have 5 different colors of a shirt you will need 5 gallery images, 5 main images and an optional 5 large images.
The second and most important tip that I can give you is that all of the images that are used for the gallery images have to be the exact same size. So if you make one gallery image 50×50 pixels, all of the additional gallery images also have to be 50×50. The same logic applies to the main images. So, if your first main image is 250×250 then all your main images have to be 250×250. This is extremely important and your site will not operate properly if you don’t do this right.
Now that you have your images lets add them to a product. First, we are going to login to the Nexternal order management system then proceed to the Products section. Now you can edit an existing product or you can add a new product. I’m going to edit an existing product.
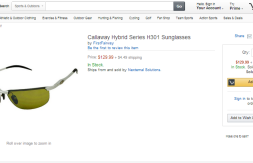
The item I’m going to set up is a golf shirt that has a few different color variations. So since I have color variations I want to add one attribute to this product then I’ll want to go to the images and audio section. From here I want to choose the Use Gallery with 3 different images option. I can upload a thumbnail of the product then for the large image I’m al so going to use image gallery. We will then scroll to the bottom of the page and click next.
On this page we will first enter the Attribute name “Color” and we are going to have 3 different options. We will then go to the Gallery Images section and upload our product images. Now I’m going to have 3 images for each color option one mini-thumbnail or gallery image, one main image and one large image. Once you’ve uploaded all your images click next.
One this screen you will see where you enter your product options and associate your images with the correct product option. This will ensure that if a shopper clicks on the red gallery image that not only will it change the image that is displayed but it will also adjust the drop down on the product page to reflect the change. After you’ve entered this information you can click next and click finish.
You’ve now set up your images and you’re ready to review your product. If you like the way the product looks, you’re on to the next one. If you need to make changes to the images you just uploaded you can easily do so from the product detail screen.
The image gallery is a great feature and we’re excited to see how you will use this to make your product pages more effective. If you have any questions on this topic feel free to contact us using the Nexternal Help Desk in your account. You can also call us at 1-800-914-6161 or email us at ecommerce@nexternal.com.
eCommerce Ninja by day and husband & father by night. Since 2003 Ty has been part of the fast growing eCommerce industry both as an Account Manager and online retailer. Ty has played a vital role in the conversion, launch and day-to-day operations of hundreds of online businesses ranging from multi-million dollar corporations to one and two person companies.