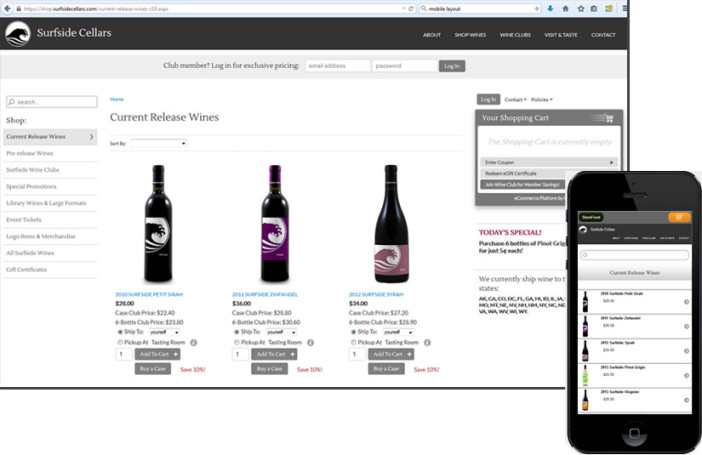
Archive for the ‘Video Help Desk & Tutorials’ Category

Nexternal Solutions – Help Desk – Payment Gateway Set Up & Credit Card Processing

Tuesday, October 6th, 2009


Nexternal makes it easy and very secure for merchants to accept and process credit cards online. Nexternal has built an integration with three of the major credit card gateway providers Authorize.net, Paymentech and PayPal Payflow Pro which allows you to authorize and capture funds or process refunds and voids directly within the Nexternal Order Management System.

Set Up Gateway:

Setting up your payment gateway is very easy. The requirements may change depending on the gateway you’re using but the set up is very similar.

The first thing we’ll want to do is to login to the Nexternal Order Management System then go to the Settings Section.

From Settings you’ll scroll down and click on Edit next to Compatible Software. Here you’ll see the Payment Gateways section and you will notice some different fields for the three integrated gateways. Once again each gateway requires different information and if you don’t have this information contact your provider and they will gladly give it to you.

After you have the information, just enter it into the appropriate field and you’re ready to configure your authorization settings.

Authorization Settings:

Once you’ve entered the correct information for your provider you’ll then want to configure your Authorization settings. Authorizations will determine how the store acts when a credit card is entered during the checkout process as you can see by the first setting “Authorize credit card before accepting order”.

If you select this option then the order will not be accepted if the card is declined for any reason. Most companies will authorize before accepting the order to make sure that they aren’t getting a number of declined cards after the order has been placed.

You can then configure a few other settings such as maximum number of attempts but the important setting to point out is the Card Validation Values or the 3-4 digit code that’s located on the back of the credit card. Some Merchant Service Providers will give you a better transaction rate when you ask for the 3-4 digit code as purchases using the code are less likely to be fraudulent. You can choose to make the code optional, required or not use the code at all.

Once you’ve configured your authorizations, you can scroll to the bottom of the page and click Finish.

That ‘s all it takes to set up your Payment Gateway but you’ll want to test the settings with a sample transaction.

Processing Credit Cards:

To thoroughly test the transaction process you’ll want to go to your online store and submit a test order with a real credit card that we can use.

Once you submit the test order you can then login to your order management system then proceed to the Orders section. You will see the order you just submitted at the top of the list and if you’re Authorizing at the time of the sale, then the billing status should say Authorized.

You can quickly process the transaction by clicking the green dollar sign next to the order number. You should receive a pop-up message saying that the order will now be processed and you’ll want to click OK.

You will then see the credit card terminal that will display the results of the transaction and as you can see the funds for this order are processed and if you close the window you will now see that the billing status has been marked as Paid. You’ve now processed this credit card through the Nexternal Order Management System and if this was a live order it would be ready to send to the customer.

If for any reason you need to get back to the terminal you can click on the order number then scroll down and click on the Credit Card Terminal button. You can also take a quick note of some of the other buttons in the terminal such as Refund, Void and Auth Capture. These buttons may come in handy for future transactions.

Now we’ve just shown you how quick and easy it is to process and individual transaction, however with the Nexternal Order Management system you are also able to bulk process several transactions at once.

If you have several orders that you would like to process at once then from the Orders screen you can click the Batch Process button which will allow you to select multiple orders and process them at the same time. This way if you have 500 orders you need to capture funds for, you won’t have to hit the green dollar sign 500 times.

As you can see Nexternal makes is fast, easy and most importantly secure for online merchants to accept credit cards. If you have any questions on this topic feel free to contact us using the Nexternal Help Desk in your account. You can also call us at 1-800-914-6161 or email us at interest@nexternal.com.

Nexternal: www.nexternal.com
Features: www.nexternal.com/ecommerce/features.asp
Demonstration: www.nexternal.com/ecommerce/demos.asp

Bookmark and Share

Nexternal Solutions – Help Desk – Image Gallery Feature

Monday, June 15th, 2009

In this video I’m going to show you how to set up and utilize the image gallery feature on your Nexternal storefront.

One of the best features that Nexternal has available for product pages is the image gallery feature. The gallery feature gives you the ability to display multiple images for a particular product then by using the rollover effect you can change the main product image that is displayed on the screen. This feature is great if you have a product that has multiple color options or you would like to show several different views of a particular product.

Setting up the gallery feature for your products if very easy, but there are two things that will help you along in the process.

First, you’re going to have 2 or 3 different sizes of images that you are going to use. You will need one for the gallery or mini-thumbnail image, one for the main image and maybe one for the large image. So if you have 5 different colors of a shirt you will need 5 gallery images, 5 main images and an optional 5 large images.

The second and most important tip that I can give you is that all of the images that are used for the gallery images have to be the exact same size. So if you make one gallery image 50×50 pixels, all of the additional gallery images also have to be 50×50. The same logic applies to the main images. So, if your first main image is 250×250 then all your main images have to be 250×250. This is extremely important and your site will not operate properly if you don’t do this right.

Now that you have your images lets add them to a product. First, we are going to login to the Nexternal order management system then proceed to the Products section. Now you can edit an existing product or you can add a new product. I’m going to edit an existing product.

The item I’m going to set up is a golf shirt that has a few different color variations. So since I have color variations I want to add one attribute to this product then I’ll want to go to the images and audio section. From here I want to choose the Use Gallery with 3 different images option. I can upload a thumbnail of the product then for the large image I’m al so going to use image gallery. We will then scroll to the bottom of the page and click next.

On this page we will first enter the Attribute name “Color” and we are going to have 3 different options. We will then go to the Gallery Images section and upload our product images. Now I’m going to have 3 images for each color option one mini-thumbnail or gallery image, one main image and one large image. Once you’ve uploaded all your images click next.

One this screen you will see where you enter your product options and associate your images with the correct product option. This will ensure that if a shopper clicks on the red gallery image that not only will it change the image that is displayed but it will also adjust the drop down on the product page to reflect the change. After you’ve entered this information you can click next and click finish.

You’ve now set up your images and you’re ready to review your product. If you like the way the product looks, you’re on to the next one. If you need to make changes to the images you just uploaded you can easily do so from the product detail screen.

The image gallery is a great feature and we’re excited to see how you will use this to make your product pages more effective. If you have any questions on this topic feel free to contact us using the Nexternal Help Desk in your account. You can also call us at 1-800-914-6161 or email us at ecommerce@nexternal.com.

Bookmark and Share

PhotoPlus SE – Free Image Editing Software

Tuesday, May 26th, 2009

image editIf you would like to edit your product or website images but don’t want to spend the money for an expensive editing program like Photoshop, try PhotoPlus SE from Serif. This free program has a lot of the same features and even the same layout as Photoshop without the hefty price tag. While you can expect a difference in quality on things like text or layering, PhotoPlus SE gives you some basic tools needed to get started on your images. PhotoPlus SE has online tutorials and an upgraded version (only $9.99) if you need some advanced features. So, if you are just looking to add some basics to your photos PhotoPlus SE should do the trick.

Bookmark and Share

Nexternal Solutions – New Feature – Customer Activities

Thursday, April 30th, 2009

In this video, I am going to provide you with a couple of quick examples of how utilize the new CRM or Customer Relationship Management tools within the Nexternal Order Management System.

In the first example scenario let’s say that I’m a customer service rep with the online retailer Firstfairway.com. I just took a call from a customer that wants to know if we intend to carry Oakley Jawbone sunglasses once they become available. So the first thing that I am going to do is document this conversation.

After logging into the Nexternal OMS and going to the customer’s section, I’ll do a quick search for the Customer by Last Name, I will then drill down on his customer record, and then record the activity. Now I told the customer that I believe this product will be available within a month and I will contact him as soon as I have any information from the manufacturer. I am sure to set a follow up date and assign myself to the owner of the account. I suspect I will have the pricing and availability info I need in 3 weeks so I’ll set the follow-up date to 21 days out.

Now, when I login 21 days from now and hit the Today button, his account will be listed amongst the customers I need to contact today. If I have the information I can call the customer with pricing and availability. If the item is still out of stock I can set another follow up date a few days ahead.

In the second example scenario let’s say that I’m a Sales Rep for FirstFairway.com. First Fairway just came out with their own line of putters and I am trying to get them into the hands of as many potential distributors as possible.
When I login to the OMS, the first thing I am going to do is hit my Today button. Once again these are distributor accounts that I have planned to call on today. I’ll click on the first account, scroll down and can see my activity history. I can see that last week he asked that I call back today, so I’ll go ahead and place the call.

During the call he mentions that he would like to commit to buying 10 of my putters, but first needs to generate a Purchase Order. He mentions that the PO Process takes about 3 days at his company. Again, I’ll record the activity and then add three business days to the follow up date. On my next call, I’ll be ready to actually place the order for this customer.

These are just a couple of examples on how you can utilize activities, owners, and follow-up dates. We are excited to see how you will use this feature update to help your business. If you have any questions on this topic feel free to contact us using the Nexternal Help Desk. You can also call us at 1-800-914-6161 or email us at ecommerce@nexternal.com.

Bookmark and Share

Nexternal Solutions – Help Desk – Google Base Product Feed

Thursday, April 9th, 2009

Google Base or Google Product Search is a free comparison shopping service provided by Google. Google Base product results are displayed when a buyer searches Google for specific product information. When the customer finds the product they like, they are directed to the merchant’s website to purchase.

Nexternal makes it extremely easy not only publish your products to Google Base but to keep that product information updated. Additionally, once you provide Nexternal with your Google Base FTP information, we will update your Google Base account automatically every night.

There are two parts to setting up your Google Base Feed. First you will need to register and set up an account with Google Base. Next you will need to transfer some of your information from Google base into the Nexternal Order Management System.

Here are the steps to follow:

The first thing you will want to do is create a Google Base account at http://www.google.com/base/.

You will now need to configure your settings by clicking “Settings.”

On this page you will be asked to enter some information about your company.

Display Name: Your display name can be anything you choose but remember it will be displayed to your potential customers.
Description: This is optional, but will provide potential customers with more information about your company.
Website URL: If you are not using a domain alias (example: shop.yourdomain.com) the Website URL most be in the following format or it will be rejected; http://www.nexternal.com/ACCOUNTNAME. If you are using a domain alias put your domain alias in this field.

Save your settings and you are now ready prepare your items for upload.

Your company’s item list will now need to be setup within Google Base.

Click on “My Items”

Click on “Data Feeds”

Click on “New Data Feed”

You will now need to enter information regarding your product feed (the file containing your products that will be sent to Google).

Item Type: Most merchants should choose “Products” here, but your organization may differ.
Select the data feed you are registering: Here you will select Google Base.
File name: It isn’t imperative what you name this file, but it must end in .txt and must be the same name as that used in the Nexternal Order Management System (Products / Export / Marketplace Exports / Preferences / Google Base Options).

You will now need to sign-up for FTP access to Google. This will allow the Nexternal software to deposit your product file to Google. You can find your FTP Information in the Settings section or by going to http://www.google.com/base/updateftp.

You will need to choose an FTP username and password. This username and password will also need to be entered into the Nexternal Order Management System (Products / Export / Marketplace Exports / Preferences / Google Base Options).

Lastly you will need to enter your Google Base information in the Nexternal Order Management System (Products / Export / Marketplace Exports / Preferences / Google Base Options).

Google Base File Name: This should correspond to the file name chosen above. Google Base FTP User Name: This should correspond to the file name chosen above. Google Base FTP Password: This should correspond to the file name chosen above.

You should now be done setting up your automated Google Base Feed. Your feed will be uploaded within 24 hours and you may check the status of your product file upload by logging into your Google Base account.

Uploading to Google Base is an easy way to generate traffic to your online store and for the price it’s tough to beat. Nexternal also recommends feeding your products to the other marketplace we work with like Shopzilla, Yahoo Shopping and PriceGrabber. The set up is very similar to the Google upload and should only take you a few minutes for each marketplace.

If you have any questions on this topic feel free to contact us using the Nexternal Help Desk. You can also call us at 1-800-914-6161 or email us at ecommerce@nexternal.com.

IMPORTANT NOTES:
*** Just because the Nexternal’s software says the Google feed was successful, does not necessarily mean that Google accepted your data. It is imperative that you log into your Google Base account after the first feed has been sent to verify its status.

The three most common problems are:
A. The Website URL was not properly specified (See #3 above)
B. The file name specified in Nexternal’s software does not match the file name that is specified in Google.
C. The Item Type is not set to “Products”.

*** You may also want to consider exporting and manually uploading to Google the .txt file that Nexternal generates.
Export file: (Products > Export/Traffic Tools > Google Base). Upload to Google: (My Items > Uploads > Manual: Upload File).

Bookmark and Share

Nexternal Solutions – Help Desk – Product Attributes

Thursday, March 26th, 2009

Nexternal’s eCommerce Shopping Cart software provides you with the ability to define several product variations based on the attributes or options selected. These variations include changing the product image, pricing, weight and even inventory. This video will show you how to set up a product with Attributes and Options then assign some variations to that product based on the option that is selected.

• The first thing we will do is login to the Nexternal Order Management System.
• Next we will go to the products section.
• From the product edit screen you are going to scroll down to the Product Options section.
• Enter the number of Attributes that you want for this product. For example if you have a product that comes in various colors and sizes you would enter 2 for Color and Size.
• You will see various sections of this product that you can define several aspects by SKU. Nexternal uses the term SKU to represent the change in the product. A lot of times these changes will change the product ID or product code you use so we generalize it with the term SKU.
• We are going to select three of the variations. We will select Pricing by SKU, Weight by SKU and then Image by SKU. Once we’ve done that Next.
• On the next screen you will see the Attributes area. Here you will see the Attribute Name field for Attribute #1 and Attribute #2. Remember we are using Color and Size as our Attributes so we will enter that in the boxes.
• The Number of options field will represent the number of options each attribute has. So if your shirt comes in Red, White and Blue, then you will have 3 options. If your shirt comes in 4 sizes, Small, Med, Large and X-Large then you will have 4 options for sizes. Once you’ve entered this information hit Next.
• On this page you will enter your Option names. Once you have enter all of your option hit Next.
• On this screen you will see all of the possible option combinations and you will see that you are able to enter the SKU pricing, weight and image for each possible combination.

Now if you have several attributes with several options or if you have several products that have attributes this list can get quite large. Luckily, Nexternal provides a bulk upload tool that you can use to upload your attributes.

After you’ve entered the information for each of the combinations hit Finish which will bring you back to the product detail page. Now you can take the URL for your item, paste it into a new window and see how it looks.

If you need to make any changes you can jump back to the detail page, scroll down to the attribute section and edit the attributes. If not, then you’re ready to move on to the next product.
If you have any questions on this topic feel free to use the Nexternal Help Desk in your account or contact us at 1-800-914-6161.

Bookmark and Share

Nexternal Solutions – Help Desk Question of the Week

Friday, March 20th, 2009

Every week Nexternal will be selecting one question that was submitted through the Help Desk by a Nexternal customer to post on the Nexternal eCommerce Blog. This week’s question comes from: Robin Fields of Monaco Coach Corporation.

Her question reads:

How can I change the status on several products at once? For example how do I move all items to Sold Out?

Changing the status of a product is a very easy thing to do with Nexternal. As a matter of fact you can change several things about a product in bulk including but not limited to pricing, descriptions, and images.

Here’s an example of how it’s done:

• Login to the Nexternal Order Management System.

• Go to the Products section.

• If you only want to update a few items you may be able to execute a search first to isolate the particular products. You can do this by going to Advanced Search/Sort then execute the search for your items. For example you may want to take all the products in the Apparel category.

• Next click on Export/Traffic Tools button at the top of the page.

• Click on the Excel Option. If you’ve executed a search first then you will want to make sure and choose the “Results of Current” search option in the Export Criteria to the right.

• Once the file is generated save it to a place where you can easily find it then open the file.

• If you go to Column N in the Excel file you will see where the Status is listed.

• In this case you would change the status to “Sold Out” then simply copy the status to the rest of the items.

• Save the file.

• From the Nexternal Order Management System go back to the Products section and this time click on Import at the top of the page.

• Click on Product Import and hit Next.

• You will want to select the Update option in Section 1 under Import Mode.

• Scroll to the bottom of the page and hit Browse to find your file.

• Upload your file and this will update all the products.

Bookmark and Share